intellij activation code login. 使用本Activation code需要jetbrains-agent支持! 插件Activation code: 06KU174Y5C--k3wWAJ+rfNRY8dj6Ard1OJ/aNuArIop6bDi3ydv+do2b26k+N4bq0lmckhlq+. Intellij idea ultimate activation code. Phần mềm JetBrains IntelliJ IDEA Ultimate – Phân tích, soạn thảo mã java giúp bạn, tìm kiếm các kết nối giữa các.
Intellij idea activation code free - matchless theme
IntelliJ IDEA 2022.2.2 Crack Full Activation Code [Key] Free Download
Intellij IDEA Crack is the greatest product allowing you to relish creative Java and is designed to enhance the creativity of developers. In other words, the program goes about as a superb analyzer for both the ergonomic design and the static codes. All in all, it makes the process not only creative but even provides a specific experience. Further, the product includes intelligent and rapid error detection, code analysis, and light code completion. Also, it offers all these things with the viable refactoring options of the product. Similarly, this unique program supplies quick and efficient outcomes with different critical tools. Moreover, it acts as an efficient program with several choices with unclear actions and methods. Besides, all these actions and processes are utilized in designing more apps in a short time. Hence, it entrusts you to create new apps and programs in an improved, earlier and expensive manner.
How to Utilize Intellij IDEA Keygen?
All in all, the app is utilized to create a super Java integrated atmosphere. In other words, it is an advanced static analyzer for code analysis and design analysis. IntelliJ IDEA Activation Code Besides, this will increase your creation rate and gives superb results. Further, the app has mission-critical options with a variety of system and language support. Additionally, you can utilize the program in a manner to effectively design the apps without hassle or plugins. Similarly, it incorporates the new features in the latest upgraded version. Moreover, the product can create instant codes, analyses, and more tasks. Essentially, it is developed in a way to create many amazing projects since it offers great ideas as well. Thus, it suggests the names, keywords, fields, methods, and class scope as well. On the other hand, this stops the irrelevant suggestions and provides only suitable forms related to the recent context.
Significant Factors Added in IntelliJ IDEA Activation Key:
Moreover, this product accompanies the vital factors in it to work proficiently. All in all, in a way to develop the program codes, it participates very actively. In addition, the app has many more tools than you think which gives superb outcomes beyond expectations. Similarly, serial keys are required to access the benefits of the entire features of the product. However, it has a full package of tools to develop programs for mobile platforms and web enterprises. IntelliJ IDEA Patch Key Afterward, it creates mobile apps like the Android apps in no time. In this way, you may use static ways to design the required apps and can also analyze the codes. On the other hand, it permits the users to show their abilities with amazing built-in tools of the product. Additionally, the app entrusts the clients to create more productive app ideas with the aid of this app. Therefore, they may get the wanted apps in a desired and quick manner.
Intellij IDEA as Productive IDE with Superb Tools:
However, the app goes about as an efficient and powerful IDE with lots of useful tools. IntelliJ IDEA Torrent Moreover, it works as the whole editing app giving simple methods to design and create software. Further, this lets you use it in your native language as it supports various languages. All in all, the clients may get it to create a clean environment to complete the tasks. Besides, with this program, you can save time as it shows all the errors taking place in the app. In such a manner, you can remove them at the time they occur to make the results error-free and efficient. Henceforth, the clients can develop the entire program without any code error leaving the outcome the most efficient. Also, it is suitable for professional customization and professional users. Even, the program gives the scrolling suggested words, autofill, keywords, and more.
Develop Desktop, Mobile, and Web Apps:
In other words, Intellij IDEA Keygen is the latest product to build web, mobile, and desktop apps in a short time. Similarly, it gives the power to create all kinds of apps or programs without wasting time. Henceforth, you can run this latest product for Java language, technology, and even Science. Moreover, it facilitates to execution of the desktop app in a smoother, easier, and faster way. Besides, the app repairs and fixes the app’s codes and more. All in all, this accompanies the useful and reliable tools used for a lifetime after activation. However, it comes with the latest codes to build the app designs. In this manner, you can run this software for your entire life with a one-time registry.
Advantages of Intellij IDEA License Code:
Additionally, it is very beneficial for programmers, Java developers, and other professional users. Further, they may utilize the product for getting the app projects in a smoother and fast manner. IntelliJ IDEA Keygen, In other words, performs all these tasks under the observation of this program. Moreover, you can easily download and install IntelliJ IDEA Serial Number. Therefore, it has a broad demand and is used all over the globe. Likewise, most of the customers only prefer to have this program for their project completion. Even, the students and other common users may utilize this app for their small school projects on JavaScript and app development. Also, it works expectedly to create amazing projects in no time.
Features of IntelliJ IDEA Keygen:
Auto Error Detection: Moreover, it comes with auto error detecting tools and offers the best answers for the projects on the spot.
Compatibility: All in all, it is compatible with OS devices, which indicates that it works with Linux, MacOSX, and Windows.
Code in Java: Further, this app is amazing for Java coding so you can work with Java as well.
Intellij IDEA is one of the most wanted programs developed for mobile and other app creation. In other words, it increases productivity with fantastic results.
Affirm that the latest version of Intellij IDEA activation tutorial for this tutorial, the activation code is collected on the Internet, please do not use it for commercial use, only for personal learning use, if there is any infringement, please contact the author to delete. If conditions permit, it is recommended that you buy genuine.
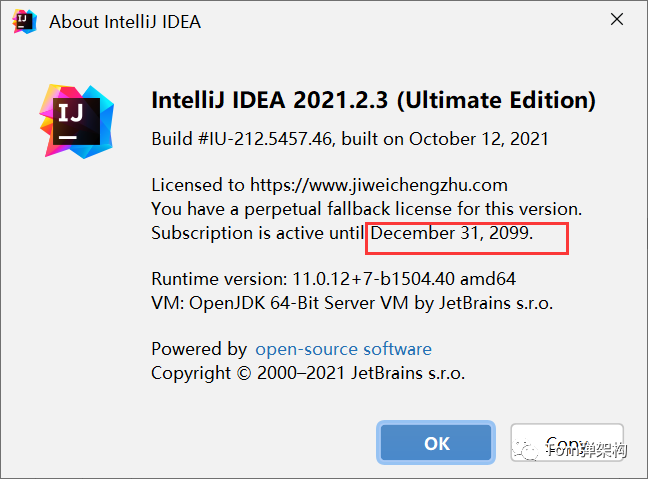
The following is a screenshot of my free activation until 2099. It supports Windows and MacOS.
1. This tutorial is applicable to all versions below Intellij IDEA 2021.2.3 2. This tutorial is applicable to the full range of JetBrains products, including IDEA, Pycharm, WebStorm, PhpStorm, AppCode, etc. 3. This tutorial is suitable for Windows/Mac/Linux. This article takes the version under Window as an example to demonstrate. The operation methods of other systems are exactly the same.
This article uses IntelliJ IDEA 2021.2.3 Windows version as an example to demonstrate the entire activation process
1 Download and install IntelliJ IDEA
Click https://www.jetbrains.com/idea/download/#section=windows enter the official website to download the latest version of IntelliJ IDEA 2021.2.3.
2 Reset IDEA and click Try
1) If your IDEA is newly installed, then you can directly click on the trial and skip the following operations in this step. The newly downloaded IDEA official can provide a free trial for 1 month.
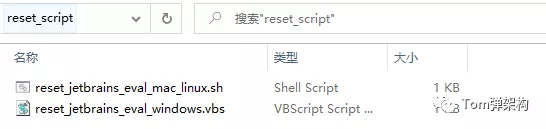
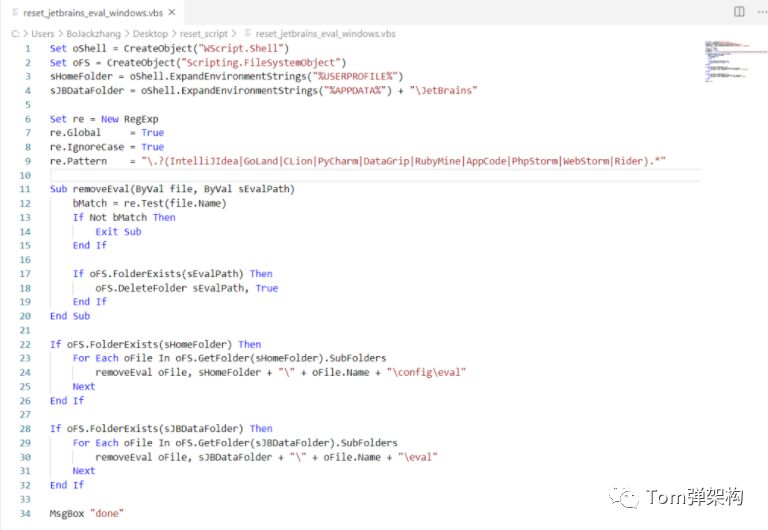
2) If IDEA has been installed on your computer before, you need to reset it first. Here is a reset script for everyone. The principle is to delete the relevant directories for the software trial of the full range of jetbrains products (other configurations will not be affected).
picture
The IDEA reset script is non-toxic, you can refer to the corresponding source code:
3) After resetting IDEA, open IDEA, click Trial, and select trial according to the icon.
3 Download the activation patch
It was originally shared on Baidu Cloud Disk, but because too many people accessing Baidu Cloud Disk at the same time, it will be blocked. I have shared multiple web disk links, and then I reply to the keywords on the official account and a download link will pop up randomly to ensure the continuous availability of the activation patch.
Friends who need to download can follow the public account "Tom Bomb Architecture" and reply to the keyword "idea" to get the activation code for free.
If the subsequent activation code becomes invalid, I will update it simultaneously.
4 Install the activation patch
1) Put FineAgent.jar in the compressed package directly to the installation location of IDEA. My IDEA is installed in D:\Program Files\JetBrains\IntelliJ IDEA 2021.2.3
2) Then, open IDEA, you can go to Help -> Eidt Custom VM Options..., refer to the following figure:
3) Add the following code in the last line
5 Restart IDEA
After the installation is complete, restart idea.
6 Use the registration code to activate IDEA
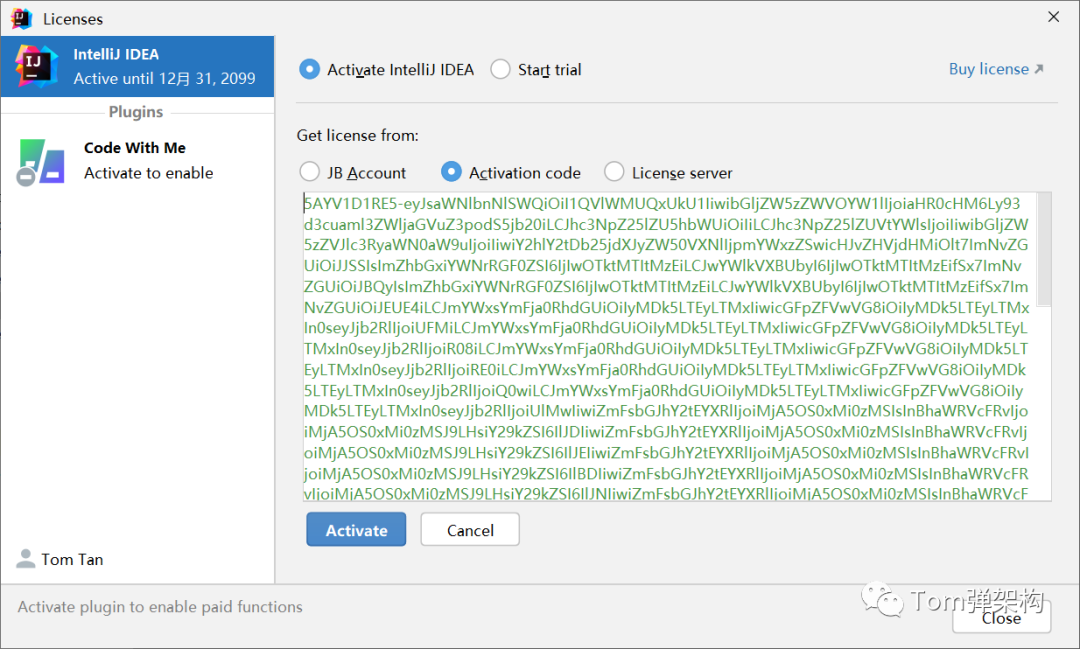
After restarting, you will be prompted to enter the activation code, which is in ActivationCode.txt in the compressed package.
Copy the content in ActivationCode.txt to complete the activation, as shown below
At this point, click Activate, and the activation is successful.
7 Verify that the activation is successful
Click Help -> Register to check the activation status. At this point, you can see that it has been successfully activated until 2099!
[Recommended] Tom bomb architecture: Collecting this article is equivalent to collecting a book of "design patterns"
This article is the original "Tom Bomb Architecture", please indicate the source for reprinting. Technology lies in sharing, I share my happiness! If this article is helpful to you, please pay attention and like it; if you have any suggestions, you can also leave a comment or private message. Your support is my motivation to persist in creating. Follow the WeChat public account "Tom Bomb Architecture" to get more technical dry goods!
IntelliJ IDEA License Activation Dialog
To open this dialog, do one of the following:
On the Welcome screen, click
From the main menu, select
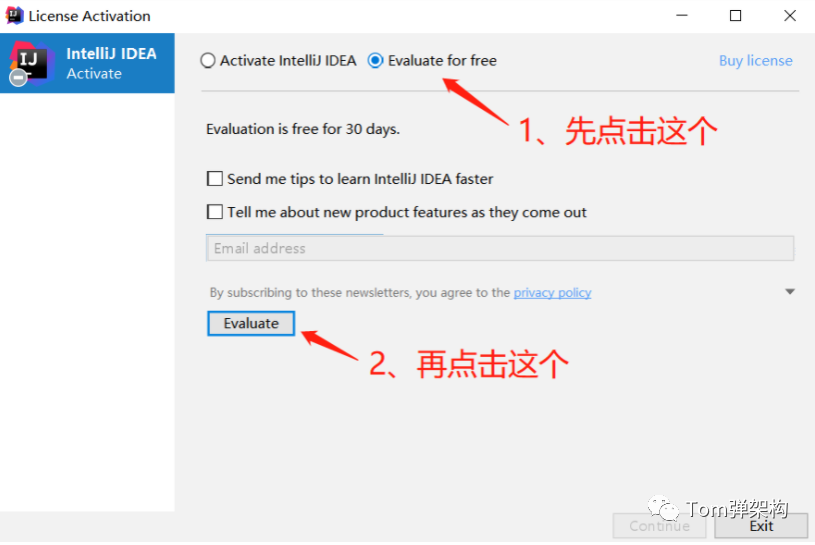
You can evaluate IntelliJ IDEA Ultimate for 30 days. After that period, you need to buy IntelliJ IDEA and activate your license.
The upper part of the dialog reflects your IntelliJ IDEA usage status (for example Free evaluation) and, if appropriate, provides related controls (for example Buy IntelliJ IDEA).
The license activation options are in the lower part of the dialog under Activate new license via.
IntelliJ IDEA usage status-related controls
Item
Description
Buy IntelliJ IDEA
Click this button to go to the JetBrains Web site to study the IntelliJ IDEA purchasing options and to buy a license.
Evaluate for free for 30 days
Click this button to start evaluating IntelliJ IDEA.
License activation options
Option
Description
JetBrains Account
Register using the JetBrains Account.
For more information, see What is JetBrains Account?
Activation code
Register using an activation code.
You are given an activation code, when you purchase a license for the corresponding product.
License server
Register using the Floating License Server.
When performing silent install or managing IntelliJ IDEA installations on multiple machines, you can set the environment variable to point the installation to the Floating License Server URL.
Chrome says this connection isnt safe (Ive switched my distro and successfully activated Intellij, Chrome still has trust issues with that link).
I have managed to import Jetbrains Keystore to my keystore, it now has 2 entries but still wont work.
For Intellij Idea License It Was
With an educational license it was impossible to retrieve an offline code through website or support a few months ago.
Im going to test it later this week and check your answer as accepted once verified.
Are you using openJDK on ubuntu, i think this occurs only on openJDK, not on oracle JDK on linux.
If you are getting stuck because you are behind a corporate proxy.
If not, make sure you import the CAs certificate to your Trusted Root Certificate Authority store.
I dont know why JetBrains didnt get a public CA to sign their certificates though but there are some developers here who have had this same issue.
Proxy server between you and our server ( ) that intercepts SSL traffic and substitutes our certificate with its own one, which is different and will not be accepted by the IDE.
Note that this proxy server may be completely transparent to you and may work without any explicit proxy configuration in your system.
Please contact your organization IT helpdesk or ISP support to get it resolved.
We have an Internal Root Certificate that needs to be installed.
I finally resolved the issue, it was a configuration problem on the reverse proxy in front of the FLS Server.
Client could get a license while talking directly to the FLS server, but not through the reverse proxy.
Provide details and share your research But avoid Asking for help, clarification, or responding to other answers.
Making statements based on opinion; back them up with references or personal experience.
Not the answer youre looking for Browse other questions tagged ubuntu intellij-idea intellij-14 sslhandshakeexception or ask your own question.
read more
Getting started with Code With Me
With IntelliJ IDEA, you can use the Code With Me plugin that enables you to share your locally running project with anyone.
You can use Code With Me for real time collaboration, editing code, sharing a server, and running a debugging session.
A Code With Me shared session involves the interaction between a host and one or more guests.
You can start a session with one of the following basic scenarios:
You can do pair-programming, in this case you share your IDE with a single participant and either use the Full sync mode, or follow each other and collaborate on different parts of code. Unlike classic pair-programming where developers share a single screen and a keyboard, you can work independently and achieve the goal faster.
You can have a teacher-students scenario where you have many participants who follow you. Let's say you need to explain a problem and show your team members different parts of your project. You can achieve that with the Force Others to Follow You mode.
You can do simultaneous multi editing of your code with other participants. In this case, participants can quickly change the code and even work on other files of the project at the same time. However, there is a limitation on how many participants can actively type together. The limit is 5, and if it's reached, IntelliJ IDEA will display a popup suggesting to wait. Additionally, it might slow down the performance.
We prepared a short video tutorial on how to start working with Code With Me:
Code With Me license
Code With Me offers different types of subscriptions that you can choose at the JetBrains website.
If you have an active IntelliJ IDEA subscription or other IDE subscription (except for DataGrip and Rider), you don't need a separate Code With Me license as it's already included in the IDE's license.
If you have the IntelliJ IDEA Community edition, you have also Community version of Code With Me license included in it.
Community and Ultimate editions of Code With Me license differ with the number of guests that is allowed and time limits of the Code With Me session.
In case you have a Community edition, but want to add more guests to your session or make it longer, or your IntelliJ IDEA license is outdated, then you can purchase a separate Premium Code With Me license.
There are several scenarios in which you might need to activate the Code With Me license manually:
You have an active IDE or an offline activation code and your license should be automatically applied to the Code With Me plugin. However, you if continue facing problems with the activation, activate the license explicitly.
You have a commercial Code With Me license, and your company uses the JetBrains floating license server (FLS). In this case, you can activate the license the same way you would activate the IntelliJ IDEA license.
Your company has commercial Code With Me licenses placed on internal lobby server. In this case, you activate the license manually additionally specifying the lobby server address.
Activate a personal license
Get a license from the JetBrains website.
From the main menu, select .
In the Licenses dialog, select Code With Me.
From the options on the right, select Activate New License.
Depending on what IDE you have, select JB Account.
If you have an active IntelliJ IDEA license, you can use Activation code for activation.
Enter the needed information and click Activate.
Activate a commercial license with Floating License Server
Get a license server URL from an responsible person in your company.
From the main menu, select .
In the Licenses dialog, select Code With Me.
From the options on the right, select Activate New License.
From the options on the right, select License server.
Add the server address and click Activate.
If you have a corporate license server with an IntelliJ IDEA license and you are experiencing timeout problems during the Code With Me session, your license server might be outdated (no plugins support). Contact your system administrator in order to update the license server or contact the JetBrains support (support-int@jetbrains.com).
Manage a commercial license with a lobby server
Get a lobby server URL from a responsible person in your company.
Press to open the IDE settings and select .
In the Lobby server URL field specify the address of the lobby server you got from your system administrator and click OK to save the changes.
Get started as a host
You can create a link to invite other participants to collaborate on your code using your computer as the host. You can also start a debugging session, share its state and actions.
Create a session
Make sure that the Code With Me plugin is enabled.
On the main toolbar, click .
Alternatively, from the main menu, select .
In the list that opens, click Start Session….
In the Code With Me: Start Session dialog, configure the access permissions for your guests and click Start Session.
IntelliJ IDEA creates a link that you can send to guests you want to invite to collaborate. To copy the invitation link, click the Code With Me icon, and select Copy Session Link.
Send the link to guests. When a guest clicks the link, IntelliJ IDEA displays a popup suggesting either to accept or decline the guest. On this step, you should verify the codes are equal for your guest and you.
Click Accept. The guest joins your session and you can start collaborating. You will see an additional caret at your editor and an icon on the main toolbar indicating the active guest.
Terminate an active session
On the main toolbar, click the Code With Me icon ().
From the list that opens, select End Session.
IntelliJ IDEA terminates the session and disables all the guests. The link also gets disabled, and you need to create a new one to start another session.
If you exit IntelliJ IDEA without terminating the session, the shared link will be disabled.
Join another IDE as a participant
On the main toolbar, click and choose Join Session….
In the dialog that opens, add the received link and click OK. After you are accepted by the Host, you can join the shared session on the other IDE.
Access the host settings
On the main toolbar, click Code With Me icon ().
Click and from the list that opens, select Settings.
Permissions
You as a host can configure what new guests may or may not access on your machine. For example, specify whether the guests can edit files, use the terminal, and execute code. You can also enable or disable the voice call option. The permissions can be configured for the whole session or for specific guests in the session.
Add permissions
On the main toolbar, click and select Permissions.
When you create a session, the dialog with permissions options is opened automatically.
In the Code With Me: Start Session dialog, specify the following options:
Read-only: select this permission for guests to have a view-only access for files, terminal, and run actions. However, guests can still copy and paste code from the editor.
Edit files: select this permission if you want your guests to only edit files, but not to access the terminal, or execute code.
You can exclude some files from accessing.
Click Manage hidden files… under the Files field and in the Hidden Files dialog add files that you want to exclude from access and click OK.
Full access: select this permission to give your guests full access to all files, terminal, and run actions on your machine.
Custom: select this permission to customize access for guests to files, terminal, and run actions. When you switch to Custom permissions, the options associated with them will repeat choices from the previously selected permissions. You can change them accordingly.
The Start call option is enabled by default, disable it to deactivate voice calls in the session.
After you configured permissions, click Start Session if you are in a process of creating a session. If you edit the permissions, click Apply.
Audio and video calls
When you collaborate with your peers, you can chat, use audio, video calls in the session, enable screen sharing, and forward your port.
Voice calls, camera, and screen sharing become available automatically when you create a session. However, you can disable them in the Edit Permissions dialog. If later, during a session, you want to initiate a call, use the Start Call option in the main toolbar under .
During the session, you can manage the voice calls.
Manage voice calls
On the main toolbar, control the camera, microphone, and your screen sharing by clicking the appropriate icons next to the Call option.
Click to select additional options when you handle the calls:
Leave Call: use this option to disable the active call.
End Call for Everyone: use this option to disable the active call for all participants at once.
This option is available for the host of the session.
Show Call Window: use this option to open the Code With Me tool window where you can manage the calls, sound, and use the session chat.
You can access the Code With Me tool window from the right side toolbar and use it to manage the call session as an alternative to the main toolbar. You can use chat, mute or unmute the microphone for your audio, manage the camera, share your screen, and so on.
Share your screen with guests
Open the Code With Me tool window.
On the bottom toolbar, click .
Your screen gets shared with other participants in the session. If you want to stop the screen sharing, click the same icon again.
If you work on a web or database project, you can give access to a port on your local machine to guests during a session.
Make sure you trust the guests with whom you share your port. Since guests might have access to system resources during port sharing.
Forward a port
Click Code With Me to open the Code With Me tool window.
In the Code With Me tool window, click the Port Forwarding tab.
Click to add a port.
In the Port Forwarding dialog add your port, select the protocol and click OK.
On the guest side, the port is added to the Port Forwarding tab in the Code With Me tool window and guests can access it.
Get started as a guest
As a guest, you can follow a host during the created session and edit the code on which the host is working. You can also follow other session participants and get access to other parts of the project. Moreover, you can run and debug code on the host's machine, and work in the terminal tool window.
Accept an invitation
Click the received link.
The IntelliJ IDEA lightweight client application will be downloaded at the run time.
You don't need to have IntelliJ IDEA installed for the lightweight version to work.
Once it is installed, IntelliJ IDEA displays a notification suggesting that you wait until the host accepts your request to join the session. When you are accepted, you are able to join the session. When the host’s project gets opened, you will see the active file in the editor.
At this point, you can customize the guest IDE to make your working process more convenient. You can change themes, view modes, and so on. The changes you make will only affect your guest IDE.
For the detailed information about JetBrains Client UI, refer to JetBrains Client UI overview.
Leave a session
On the main toolbar, click .
From the list that opens, select Leave Session.
The session is terminated and the Code With Me welcome screen is displayed. You can quickly return to the same session without any accepting process from the host using the same link.
Guest Code With Me setup locations
After you set up your work with Code With Me as a guest, you can check the following locations to see where the Code With Me distribution, logs, settings, and caches are located in your file system:
The Code With Me logs:
The Code With Me caches:
The Code With Me settings:
The Code With Me distributions and JetBrains runtime:
There are several scenarios, in which the distributions and runtime are downloaded into 2 different folders: JetBrainsClientDist (downloads JetBrains Client from JetBrains Gateway or IntelliJ IDEA) and CodeWithMeClientDist (downloads JetBrains Client from a browser)
Work in a shared session
Once a shared session is created and all invited participants are accepted, the editor will contain the additional carets, the main toolbar will display the guests' icons, and the Code With Me tool window with the voice calls and the chat support becomes available.
In a shared session you can try different things such as move around the host's project independently, follow other participants, use the terminal tool window, make code edits, and so on.
Follow a participant
On the main toolbar, click .
From the list that opens, select the name of the participant you want to follow and select Follow.
Alternatively, on the main toolbar, click the needed participant's icon.
IntelliJ IDEA places your caret at top of the participant's caret and places a frame around the editor with a small label displaying the name of the participant you are following.
Click Stop next to the name to unfollow the participant. You can always click Resume to follow the same participant once again.
You can have more than one participant following other participants. When one of the followers decides to switch focus, it will not affect the main host. This is helpful in the teacher-students use case.
Force all others to follow you
On the main toolbar, click .
From the list that opens, select Make Everyone Follow You.
In this case, all the guest carets are placed on top of the host, and the focus will switch if the main caret is placed in the other files of the project.
At any time, a participant can stop following the main caret.
Jump to other participant
On the main toolbar, click .
From the list that opens, click a name of the participant and select Jump To Cursor.
Alternatively, on the main toolbar, right-click the participant's icon and select the same option.
The caret is placed on the line where the selected guest's caret is located. This might be helpful if you want to quickly locate a certain participant's caret.
Use the full sync mode
On the main toolbar, click .
From the list that opens, choose the name of a participant and select Pair Coding Mode.
Alternatively, on the main toolbar, right-click the participant's icon and select the same option.
The caret is placed on top of the host's caret. IntelliJ IDEA places a frame around both the host's editor and the guest's editor indicating that the pair-coding mode is on.
The focus stays within the host caret even if the caret is placed in other parts of the project. This mode is usually used in the pair-programming scenario.
Terminate a shared session for a specific user
On the main toolbar, click .
From the list that opens, click a name of the participant for whom you want to terminate the session and select Remove Guest.
Alternatively, on the main toolbar right-click the participant's icon and select the same option.
IntelliJ IDEA terminates the session for the selected participant and displays a notification on the guest's side. IntelliJ IDEA closes the guest project and returns the guest to the Code With Me welcome screen.
If the guest wants to return to the shared session, they need to wait for the host permission to join.
Collect logs for the current guest
On the Code With Me welcome screen, click next to Settings/Preferences.
From the list that opens, select Collect Logs and Diagnostic Data.
IntelliJ IDEA creates a log file on your local machine. The log file contains the current project's filenames, parts of code, and detailed information on guest's activity such as caret movements, typed symbols, invoked actions, files opened, file paths, and so on.
Collect all logs in the session
On the main toolbar, click .
In the list that opens, click and select Submit an Issue.
In the dialog that opens, click OK to approve the data collection.
Once the log details are collected, they are automatically attached to the newly created issue in the YouTrack system.
Change the session name or URL of the session server
You can change the default name of the created session using the Code With Me settings.
You can also change the URL of a lobby server used for a session. It might be useful to switch to your own company's server for security purposes.
Access the Code With Me settings
In the main menu, open Settings - Tools - Code With Me
In the User name field enter a new name for your session. The session name will be changed on the restart. Clicking Use System Name will reset the session name to the default one.
You can change the default server URL, in the Lobby server URL field.
For more information, refer to the Code With Me help.
Affirm that the latest version of Intellij IDEA activation tutorial for this tutorial, the activation code is collected on the Internet, please do not use it for commercial use, only for personal learning use, if there is any infringement, please contact the author to delete. If conditions permit, it is recommended that you buy genuine.
The following is a screenshot of my free activation until 2099. It supports Windows and MacOS.
1. This tutorial is applicable to all versions below Intellij IDEA 2021.2.3 2. This tutorial is applicable to the full range of JetBrains products, including IDEA, Pycharm, WebStorm, PhpStorm, AppCode, etc. 3. This tutorial is suitable for Windows/Mac/Linux. This article takes the version under Window as an example to demonstrate. The operation methods of other systems are exactly the same.
This article uses IntelliJ IDEA 2021.2.3 Windows version as an example to demonstrate the entire activation process
1 Download and install IntelliJ IDEA
Click https://www.jetbrains.com/idea/download/#section=windows enter the official website to download the latest version of IntelliJ IDEA 2021.2.3.
2 Reset IDEA and click Try
1) If your IDEA is newly installed, then you can directly click on the trial and skip the following operations in this step. The newly downloaded IDEA official can provide a free trial for 1 month.
2) If IDEA has been installed on your computer before, you need to reset it first. Here is a reset script for everyone. The principle is to delete the relevant directories for the software trial of the full range of jetbrains products (other configurations will not be affected).
picture
The IDEA reset script is non-toxic, you can refer to the corresponding source code:
3) After resetting IDEA, open IDEA, click Trial, and select trial according to the icon.
3 Download the activation patch
It was originally shared on Baidu Cloud Disk, but because too many people accessing Baidu Cloud Disk at the same time, it will be blocked. I have shared multiple web disk links, and then I reply to the keywords on the official account and a download link will pop up randomly to ensure the continuous availability of the activation patch.
Friends who need to download can follow the public account "Tom Bomb Architecture" and reply to the keyword "idea" to get the activation code for free.
If the subsequent activation code becomes invalid, I will update it simultaneously.
4 Install the activation patch
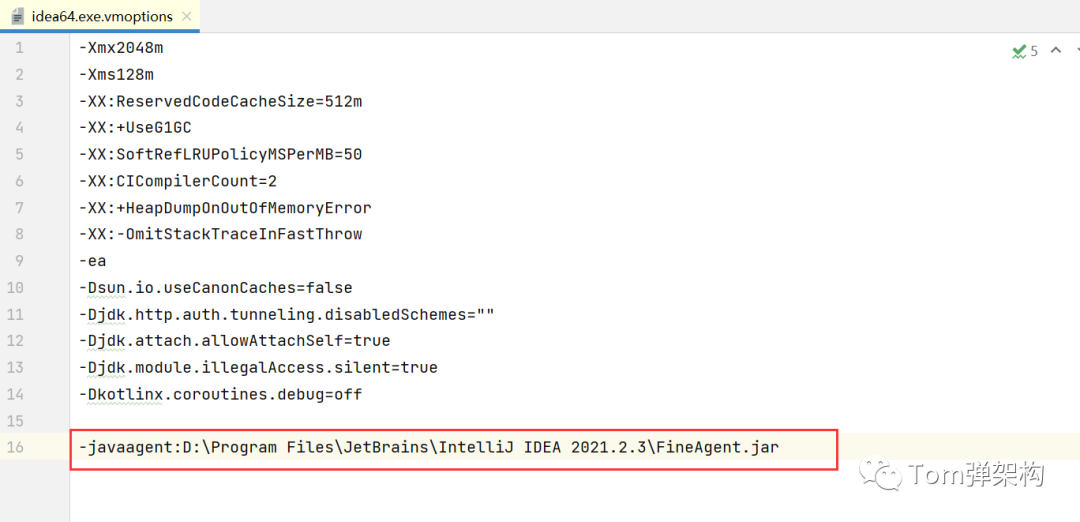
1) Put FineAgent.jar in the compressed package directly to the installation location of IDEA. My IDEA is installed in D:\Program Files\JetBrains\IntelliJ IDEA 2021.2.3
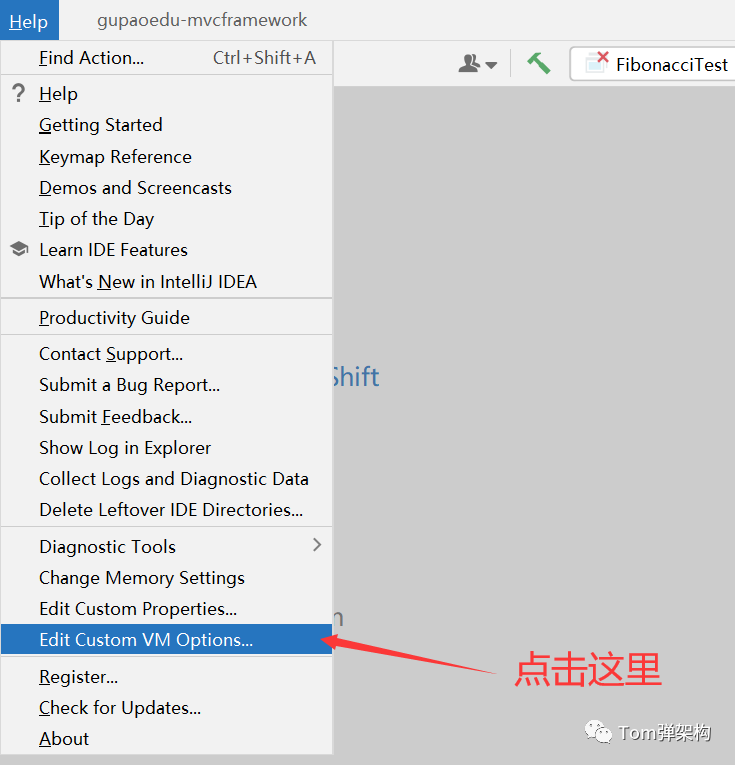
2) Then, open IDEA, you can go to Help -> Eidt Custom VM Options..., refer to the following figure:
3) Add the following code in the last line
5 Restart IDEA
After the installation is complete, restart idea.
6 Use the registration code to activate IDEA
After restarting, you will be prompted to enter the activation code, which is in ActivationCode.txt in the compressed package.
Copy the content in ActivationCode.txt to complete the activation, as shown below
At this point, click Activate, and the activation is successful.
7 Verify that the activation is successful
Click Help -> Register to check the activation status. At this point, you can see that it has been successfully activated until 2099!
[Recommended] Tom bomb architecture: Collecting this article is equivalent to collecting a book of "design patterns"
This article is the original "Tom Bomb Architecture", please indicate the source for reprinting. Technology lies in sharing, I share my happiness! If this article is helpful to you, please pay attention and like it; if you have any suggestions, you can also leave a comment or private message. Your support is my motivation to persist in creating. Follow the WeChat public account "Tom Bomb Architecture" to get more technical dry goods!
Chrome says this connection isnt safe (Ive switched my distro and successfully activated Intellij, Chrome still has trust issues with that link).
I have managed to import Jetbrains Keystore to my keystore, it now has 2 entries but still wont work.
For Intellij Idea License It Was
With an educational license it was impossible to retrieve an offline code through website or support a few months ago.
Im going to test it later this week and check your answer as accepted once verified.
Are you using openJDK on ubuntu, i think this occurs only on openJDK, not on oracle JDK on linux.
If you are getting stuck because you are behind a corporate proxy.
If not, make sure you import the CAs certificate to your Trusted Root Certificate Authority store.
I dont know why JetBrains didnt get a public CA to sign their certificates though but there are some developers here who have had this same issue.
Proxy server between you and our server ( ) that intercepts SSL traffic and substitutes our certificate with its own one, which is different and will not be accepted by the IDE.
Note that this proxy server may be completely transparent to you and may work without any explicit proxy configuration in your system.
Please contact your organization IT helpdesk or ISP support to get it resolved.
We have an Internal Root Certificate that needs to be installed.
I finally resolved the issue, it was a configuration problem on the reverse proxy in front of the FLS Server.
Client could get a license while talking directly to the FLS server, but not through the reverse proxy.
Provide details and share your research But avoid Asking for help, clarification, or responding to other answers.
Making statements based on opinion; back them up with references or personal experience.
Not the answer youre looking for Browse other questions tagged ubuntu intellij-idea intellij-14 sslhandshakeexception or ask your own question.
read more
Getting started with Code With Me
With IntelliJ IDEA, you can use the Code With Me plugin that enables you to share your locally running project with anyone.
You can use Code With Me for real time collaboration, editing code, sharing a server, and running a debugging session.
A Code With Me shared session involves the interaction between a host and one or more guests.
You can start a session with one of the following basic scenarios:
You can do pair-programming, in this case you share your IDE with a single participant and either use the Full sync mode, or follow each other and collaborate on different parts of code. Unlike classic pair-programming where developers share a single screen and a keyboard, you can work independently and achieve the goal faster.
You can have a teacher-students scenario where you have many participants who follow you. Let's say you need to explain a problem and show your team members different parts of your project. You can achieve that with the Force Others to Follow You mode.
You can do simultaneous multi editing of your code with other participants. In this case, participants can quickly change the code and even work on other files of the project at the same time. However, there is a limitation on how many participants can actively type together. The limit is 5, and if it's reached, IntelliJ IDEA will display a popup suggesting to wait. Additionally, it might slow down the performance.
We prepared a short video tutorial on how to start working with Code With Me:
Code With Me license
Code With Me offers different types of subscriptions that you can choose at the JetBrains website.
If you have an active IntelliJ IDEA subscription or other IDE subscription (except for DataGrip and Rider), you don't need a separate Code With Me license as it's already included in the IDE's license.
If you have the IntelliJ IDEA Community edition, you have also Community version of Code With Me license included in it.
Community and Ultimate editions of Code With Me license differ with the number of guests that is allowed and time limits of the Code With Me session.
In case you have a Community edition, but want to add more guests to your session or make it longer, or your IntelliJ IDEA license is outdated, then you can purchase a separate Premium Code With Me license.
There are several scenarios in which you might need to activate the Code With Me license manually:
You have an active IDE or an offline activation code and your license should be automatically applied to the Code With Me plugin. However, you if continue facing problems with the activation, activate the license explicitly.
You have a commercial Code With Me license, and your company uses the JetBrains floating license server (FLS). In this case, you can activate the license the same way you would activate the IntelliJ IDEA license.
Your company has commercial Code With Me licenses placed on internal lobby server. In this case, you activate the license manually additionally specifying the lobby server address.
Activate a personal license
Get a license from the JetBrains website.
From the main menu, select .
In the Licenses dialog, select Code With Me.
From the options on the right, select Activate New License.
Depending on what IDE you have, select JB Account.
If you have an active IntelliJ IDEA license, you can use Activation code for activation.
Enter the needed information and click Activate.
Activate a commercial license with Floating License Server
Get a license server URL from an responsible person in your company.
From the main menu, select .
In the Licenses dialog, select Code With Me.
From the options on the right, select Activate New License.
From the options on the right, select License server.
Add the server address and click Activate.
If you have a corporate license server with an IntelliJ IDEA license and you are experiencing timeout problems during the Code With Me session, your license server might be outdated (no plugins support). Contact your system administrator in order to update the license server or contact the JetBrains support (support-int@jetbrains.com).
Manage a commercial license with a lobby server
Get a lobby server URL from a responsible person in your company.
Press to open the IDE settings and select .
In the Lobby server URL field specify the address of the lobby server you got from your system administrator and click OK to save the changes.
Get started as a host
You can create a link to invite other participants to collaborate on your code using your computer as the host. You can also start a debugging session, share its state and actions.
Create a session
Make sure that the Code With Me plugin is enabled.
On the main toolbar, click .
Alternatively, from the main menu, select .
In the list that opens, click Start Session….
In the Code With Me: Start Session dialog, configure the access permissions for your guests and click Start Session.
IntelliJ IDEA creates a link that you can send to guests you want to invite to collaborate. To copy the invitation link, click the Code With Me icon, and select Copy Session Link.
Send the link to guests. When a guest clicks the link, IntelliJ IDEA displays a popup suggesting either to accept or decline the guest. On this step, you should verify the codes are equal for your guest and you.
Click Accept. The guest joins your session and you can start collaborating. You will see an additional caret at your editor and an icon on the main toolbar indicating the active guest.
Terminate an active session
On the main toolbar, click the Code With Me icon ().
From the list that opens, select End Session.
IntelliJ IDEA terminates the session and disables all the guests. The link also gets disabled, and you need to create a new one to start another session.
If you exit IntelliJ IDEA without terminating the session, the shared link will be disabled.
Join another IDE as a participant
On the main toolbar, click and choose Join Session….
In the dialog that opens, add the received link and click OK. After you are accepted by the Host, you can join the shared session on the other IDE.
Access the host settings
On the main toolbar, click Code With Me icon ().
Click and from the list that opens, select Settings.
Permissions
You as a host can configure what new guests may or may not access on your machine. For example, specify whether the guests can edit files, use the terminal, and execute code. You can also enable or disable the voice call option. The permissions can be configured for the whole session or for specific guests in the session.
Add permissions
On the main toolbar, click and select Permissions.
When you create a session, the dialog with permissions options is opened automatically.
In the Code With Me: Start Session dialog, specify the following options:
Read-only: select this permission for guests to have a view-only access for files, terminal, and run actions. However, guests can still copy and paste code from the editor.
Edit files: select this permission if you want your guests to only edit files, but not to access the terminal, or execute code.
You can exclude some files from accessing.
Click Manage hidden files… under the Files field and in the Hidden Files dialog add files that you want to exclude from access and click OK.
Full access: select this permission to give your guests full access to all files, terminal, and run actions on your machine.
Custom: select this permission to customize access for guests to files, terminal, and run actions. When you switch to Custom permissions, the options associated with them will repeat choices from the previously selected permissions. You can change them accordingly.
The Start call option is enabled by default, disable it to deactivate voice calls in the session.
After you configured permissions, click Start Session if you are in a process of creating a session. If you edit the permissions, click Apply.
Audio and video calls
When you collaborate with your peers, you can chat, use audio, video calls in the session, enable screen sharing, and forward your port.
Voice calls, camera, and screen sharing become available automatically when you create a session. However, you can disable them in the Edit Permissions dialog. If later, during a session, you want to initiate a call, use the Start Call option in the main toolbar under .
During the session, you can manage the voice calls.
Manage voice calls
On the main toolbar, control the camera, microphone, and your screen sharing by clicking the appropriate icons next to the Call option.
Click to select additional options when you handle the calls:
Leave Call: use this option to disable the active call.
End Call for Everyone: use this option to disable the active call for all participants at once.
This option is available for the host of the session.
Show Call Window: use this option to open the Code With Me tool window where you can manage the calls, sound, and use the session chat.
You can access the Code With Me tool window from the right side toolbar and use it to manage the call session as an alternative to the main toolbar. You can use chat, mute or unmute the microphone for your audio, manage the camera, share your screen, and so on.
Share your screen with guests
Open the Code With Me tool window.
On the bottom toolbar, click .
Your screen gets shared with other participants in the session. If you want to stop the screen sharing, click the same icon again.
If you work on a web or database project, you can give access to a port on your local machine to guests during a session.
Make sure you trust the guests with whom you share your port. Since guests might have access to system resources during port sharing.
Forward a port
Click Code With Me to open the Code With Me tool window.
In the Code With Me tool window, click the Port Forwarding tab.
Click to add a port.
In the Port Forwarding dialog add your port, select the protocol and click OK.
On the guest side, the port is added to the Port Forwarding tab in the Code With Me tool window and guests can access it.
Get started as a guest
As a guest, you can follow a host during the created session and edit the code on which the host is working. You can also follow other session participants and get access to other parts of the project. Moreover, you can run and debug code on the host's machine, and work in the terminal tool window.
Accept an invitation
Click the received link.
The IntelliJ IDEA lightweight client application will be downloaded at the run time.
You don't need to have IntelliJ IDEA installed for the lightweight version to work.
Once it is installed, IntelliJ IDEA displays a notification suggesting that you wait until the host accepts your request to join the session. When you are accepted, you are able to join the session. When the host’s project gets opened, you will see the active file in the editor.
At this point, you can customize the guest IDE to make your working process more convenient. You can change themes, view modes, and so on. The changes you make will only affect your guest IDE.
For the detailed information about JetBrains Client UI, refer to JetBrains Client UI overview.
Leave a session
On the main toolbar, click .
From the list that opens, select Leave Session.
The session is terminated and the Code With Me welcome screen is displayed. You can quickly return to the same session without any accepting process from the host using the same link.
Guest Code With Me setup locations
After you set up your work with Code With Me as a guest, you can check the following locations to see where the Code With Me distribution, logs, settings, and caches are located in your file system:
The Code With Me logs:
The Code With Me caches:
The Code With Me settings:
The Code With Me distributions and JetBrains runtime:
There are several scenarios, in which the distributions and runtime are downloaded into 2 different folders: JetBrainsClientDist (downloads JetBrains Client from JetBrains Gateway or IntelliJ IDEA) and CodeWithMeClientDist (downloads JetBrains Client from a browser)
Work in a shared session
Once a shared session is created and all invited participants are accepted, the editor will contain the additional carets, the main toolbar will display the guests' icons, and the Code With Me tool window with the voice calls and the chat support becomes available.
In a shared session you can try different things such as move around the host's project independently, follow other participants, use the terminal tool window, make code edits, and so on.
Follow a participant
On the main toolbar, click .
From the list that opens, select the name of the participant you want to follow and select Follow.
Alternatively, on the main toolbar, click the needed participant's icon.
IntelliJ IDEA places your caret at top of the participant's caret and places a frame around the editor with a small label displaying the name of the participant you are following.
Click Stop next to the name to unfollow the participant. You can always click Resume to follow the same participant once again.
You can have more than one participant following other participants. When one of the followers decides to switch focus, it will not affect the main host. This is helpful in the teacher-students use case.
Force all others to follow you
On the main toolbar, click .
From the list that opens, select Make Everyone Follow You.
In this case, all the guest carets are placed on top of the host, and the focus will switch if the main caret is placed in the other files of the project.
At any time, a participant can stop following the main caret.
Jump to other participant
On the main toolbar, click .
From the list that opens, click a name of the participant and select Jump To Cursor.
Alternatively, on the main toolbar, right-click the participant's icon and select the same option.
The caret is placed on the line where the selected guest's caret is located. This might be helpful if you want to quickly locate a certain participant's caret.
Use the full sync mode
On the main toolbar, click .
From the list that opens, choose the name of a participant and select Pair Coding Mode.
Alternatively, on the main toolbar, right-click the participant's icon and select the same option.
The caret is placed on top of the host's caret. IntelliJ IDEA places a frame around both the host's editor and the guest's editor indicating that the pair-coding mode is on.
The focus stays within the host caret even if the caret is placed in other parts of the project. This mode is usually used in the pair-programming scenario.
Terminate a shared session for a specific user
On the main toolbar, click .
From the list that opens, click a name of the participant for whom you want to terminate the session and select Remove Guest.
Alternatively, on the main toolbar right-click the participant's icon and select the same option.
IntelliJ IDEA terminates the session for the selected participant and displays a notification on the guest's side. IntelliJ IDEA closes the guest project and returns the guest to the Code With Me welcome screen.
If the guest wants to return to the shared session, they need to wait for the host permission to join.
Collect logs for the current guest
On the Code With Me welcome screen, click next to Settings/Preferences.
From the list that opens, select Collect Logs and Diagnostic Data.
IntelliJ IDEA creates a log file on your local machine. The log file contains the current project's filenames, parts of code, and detailed information on guest's activity such as caret movements, typed symbols, invoked actions, files opened, file paths, and so on.
Collect all logs in the session
On the main toolbar, click .
In the list that opens, click and select Submit an Issue.
In the dialog that opens, click OK to approve the data collection.
Once the log details are collected, they are automatically attached to the newly created issue in the YouTrack system.
Change the session name or URL of the session server
You can change the default name of the created session using the Code With Me settings.
You can also change the URL of a lobby server used for a session. It might be useful to switch to your own company's server for security purposes.
Access the Code With Me settings
In the main menu, open Settings - Tools - Code With Me
In the User name field enter a new name for your session. The session name will be changed on the restart. Clicking Use System Name will reset the session name to the default one.
You can change the default server URL, in the Lobby server URL field.
For more information, refer to the Code With Me help.
I have entered my Jetbrains license and already created a project three times now. I imported IDE settings which requires a and when the restart happens poof the license/activation key is gone as well as the project that had already been opened.
This is a strange behavior. I have installed and used the jetbrains products many dozens of times on different computers and had not seen this before. In fact and are working normally on this same computer.
idea Official download address :https://www.jetbrains.com/idea/download/other.html
2、idea2021 Registration code
Here we share an activation code for free , Valid for 1 year , Not a month !!!
If the activation code fails , You can go here to extract :https://docs.qq.com/doc/DU1pxaFhjZlN5dmdX
The activation code is as follows :
3、Intellij idea Introduce
IntelliJ IDEA Mainly used to support Java、Scala、Groovy And other language development tools , It also has the technology and framework to support the current mainstream , Good at enterprise applications 、 Mobile apps and Web Application development .
IntelliJ IDEA The definition of self is very clear , For newcomers, they may not understand , There may be misunderstandings , Think it's broad but not refined , But for old users, they should recognize the above sentence very much . Through the following function table , Newcomers to IntelliJ IDEA There will be a new understanding of its functions .
If we use a word to describe IntelliJ IDEA, I would say :IntelliJ IDEA It's all... At the moment IDE The most immersive JVM IDE, Not one of them. .
I have entered my Jetbrains license and already created a Free Download Wise Registry Cleaner three times now. I imported IDE settings which requires a and when the restart happens poof the license/activation key is gone as well as the project that had already been opened.
This is a strange behavior. I have installed and used the jetbrains products many dozens of times on different computers and had not seen this before. In fact and are working normally on this same computer.
IntelliJ IDEA 2022.2.3 Crack is a reliable code editor when you are working on mobile and web platforms. It is the best solution for developers to write efficient code in modern languages like Java, Scala, Groovy, etc. IntelliJ IDEA Crack 2022.2.3 is a platform where you can develop mobile and web applications. It supports Mac and Windows OS. With it, you can easily merge and subtract the code. Also, you can use it to build your custom games. IntelliJ IDEA 2022 Crackeado is easy to get better results and very fast in processing.
IntelliJ IDEA Mac Crack Windows
It still makes it easier for people to use this application. It indicates that it is beneficial to developers. IntelliJ IDEA 2022.2.3 Crack is also helpful to potential consumers. As a direct consequence, it is a valuable method for learning programming languages. IntelliJ Crack students and web admins can find it easy to use. Both are web applications that you can download on your computers at any time.
IntelliJ IDEA 2022.2.3 Torrent
It is a medium for writing javascript. Intellij idea crack has a simple interface and a shortcut alternative, and some obscure techniques and tricks. These tips and tricks will help you write more code in less time. As a result, you can alter the code at any time. You will build fantastic programs if you learn how to code. IntelliJ IDEA 2022.2.3 Torrent is just here, one click away from you. Also, I will set you up as a webmaster since all web applications will run on any smartphone.
IntelliJ IDEA Activation Code 2022.2.3
ASITH-RYUIH-GDSKV-BJSAE-RUTIE
RSGLA-FJPEW-JIUPE-WRUGT-REHGK
You can even modify it at any moment. So, all of the options, such as edit or alter, are open. You, too, have an excellent way to expand your skills. IntelliJ 2022.2.3 Crack performs a variety of technical tasks. Millions of users use this software to write programming code. It is unrivaled by every other function. Since this is a unique opportunity for their consumers, intellij idea activation code free. As a result, you can conveniently download it from this link.
Free Download IntelliJ IDEA Torrent the syntax color is simple to use. Also, you can use the autocomplete and refactoring functions as well. Many of the features include several acts that they completed.
IntelliJ IDEA License Key 2022.2.3
ZSOIG-HERIU-EHIUG-BSLJV-NOAHE
TW1YT-UI4H-GSLHW-IA3RE-WYTFN
That is why IntelliJ IDEA Keygen is superior to other tech tools. This code editing tool assists you more and more with each passing moment. It’s just the living that’s so fantastic all the time. And the best part is that these applications are compatible with every smartphone. So, this tool is capable of supporting all devices. Get here IntelliJ IDEA 2022.2.3 Activation Code to run this fantastic software for a lifetime. It’s a one-of-a-kind tool for the consumer. So, if you want to make an app, this is a good one.
IntelliJ IDEA Software Crack
This tool is the right one for you. Its excellent features will assist you in coming up with new ideas. As well as, IntelliJ Torrent ensures they will provide you with a lot of tips for doing a decent job. They will even inform you if you have any mistakes. It’s straightforward and more dependable than most. It gives you the best emerging world with a plethora of options. IntelliJ IDEA 2022.2.3 Key functionality, as well as tools for professional-level performance, will appeal to you. If you’re looking for the proper development software, look no further. Then you’ll find what you’re looking for right here.
You can get it by clicking on the page below. Additionally, the print service will assist you. It means you’ll be able to print the code quickly. IntelliJ IDEA Software Crack will yield positive outcomes. It has the potential to make your Reason 10 Full Download Free Activators very cool and simple to use. It is the most innovative and forward-thinking tech available.
What’s New?
Latest version: IntelliJ IDEA 2022.2.3 Crack
More professional tools.
Faster development and easy to use.
More language tags.
New themes for users.
Old version bugs fixed.
System Requirements:
Minimum:
RAM: 1 GB RAM
300 MB disk space
Recommended:
1024×768
How To Crack IntelliJ IDEA Free Download
Click below to IntelliJ IDEA Crack Download for a lifetime.
after that open the file and then install it in the system.
Now use the Key for the Activation.
Now, start development.
{IntelliJ IDEA 2022.2.3 Crack}
Summary
Reviewer
Lois
Review Date
Reviewed Item
IntelliJ IDEA
Author Rating
Software Name
IntelliJ IDEA
Software Name
Mac, Windows
Software Category
IDE
Categories 2022, Activated, Mac, WindowsTags Crack IntelliJ IDEA, IntelliJ IDEA 2022 Crack, IntelliJ IDEA 2022.2 Crack, IntelliJ IDEA 2022.2.3 Crack, IntelliJ IDEA 2022.3 Crack, IntelliJ IDEA Activation Code, IntelliJ IDEA Crack, IntelliJ IDEA Crackeado, IntelliJ IDEA Cracked, IntelliJ IDEA Key, IntelliJ IDEA Keygen, IntelliJ IDEA License Key, IntelliJ IDEA Mac Crack, IntelliJ IDEA Patch, IntelliJ IDEA Torrent, Key IntelliJ IDEA, Torrent IntelliJ IDEA
Chrome says this connection isnt safe (Ive switched my distro and successfully activated Intellij, Chrome still has trust issues with that link).
I have managed to import Jetbrains Keystore to my keystore, it now has 2 entries but still wont work.
For Intellij Idea License It Was
With an educational license it was impossible to retrieve an offline code through website or support a few months ago.
Im going to test it later this week and check your answer as accepted once verified.
Are you using openJDK on ubuntu, i think this occurs only on openJDK, not on oracle JDK on linux.
If you are getting stuck because you are behind a corporate proxy.
If not, make sure you import the CAs certificate to your Trusted Root Certificate Authority store.
I dont know why JetBrains didnt get a public CA to sign their certificates though but there are some developers here who have had this same issue.
Proxy server between you and our server ( ) that intercepts SSL traffic and substitutes our certificate with its own one, which is different and will not be accepted by the IDE.
Note that this proxy server may be completely transparent to you and may work without any explicit proxy configuration in your system.
Please contact your organization IT helpdesk or ISP support intellij idea activation code free get it resolved.
We have an Internal Intellij idea activation code free Certificate that needs to be installed.
I finally resolved the issue, intellij idea activation code free, it was a configuration problem on the reverse proxy in front of the FLS Server.
Client could get a license while talking directly to the FLS server, but not through the reverse proxy.
Provide details and share your research But avoid Asking intellij idea activation code free help, clarification, or responding to other answers.
Making statements based on opinion; back them up with references or personal experience.
Not the answer youre looking for Browse other questions tagged ubuntu intellij-idea intellij-14 sslhandshakeexception or ask your own question.
read more
IntelliJ IDEA 2022.2.2 Crack Full Activation Code [Key] Free Download
Intellij IDEA Crack is the greatest product allowing you to relish creative Java and is designed to enhance the creativity of developers. In other words, the program goes about as a superb analyzer for both the ergonomic design and the static codes. All in all, it makes the process not only creative but even provides a specific experience. Further, the product includes intelligent and rapid error detection, code analysis, and light code completion. Also, it offers all these things with the viable refactoring options of the product. Similarly, this unique program supplies quick and efficient outcomes with different critical tools. Moreover, it acts as an efficient program with several choices with unclear actions and methods. Besides, all these actions and processes are utilized in designing more apps in a short time. Hence, it entrusts you to create new apps and programs in an improved, earlier and expensive manner.
How to Utilize Intellij IDEA Keygen?
All in all, the app is utilized to create a super Java integrated atmosphere. In other words, it is an advanced static analyzer for code analysis and design analysis. IntelliJ IDEA Activation Code Besides, this will increase your creation rate and gives superb results. Further, the app has mission-critical options with a variety of system and language support, intellij idea activation code free. Additionally, you can utilize the program in a manner to effectively design the apps without hassle or plugins. Similarly, it intellij idea activation code free the new features in the latest upgraded version. Moreover, the product can create instant codes, analyses, and more tasks. Essentially, it is developed in a way to create many amazing projects since it offers great ideas as well. Thus, it suggests the names, keywords, intellij idea activation code free, fields, methods, and class scope as well. On the other hand, this stops the irrelevant suggestions and provides only suitable forms related to the recent context.
Significant Factors Added in IntelliJ IDEA Activation Key:
Moreover, this product accompanies the vital factors in it to work proficiently. All in all, in a way to develop the program codes, it participates very actively. In addition, the app has many more tools than you think which gives superb outcomes beyond expectations. Similarly, intellij idea activation code free, serial keys are required to access the benefits of the entire features of the product. However, it has a full package of tools to develop programs for mobile platforms and web enterprises. IntelliJ IDEA Patch Key Afterward, it creates mobile apps like the Android apps in no time. In this way, you may use static ways to design the required apps and can also analyze the codes. On the other hand, it permits the users to show their abilities with amazing built-in tools of the product. Additionally, the app entrusts the clients to create more productive app ideas with the aid of this app. Therefore, they may get the wanted apps in a desired and quick manner.
Intellij IDEA as Productive IDE with Superb Tools:
However, intellij idea activation code free, the app goes about as an efficient and powerful IDE with lots of useful tools. IntelliJ IDEA Torrent Moreover, it works as the whole editing app giving simple methods to design and create software. Further, this lets you use it in your native language as it supports various languages. All in all, the clients may get it to create a clean environment to complete the tasks. Besides, with this program, you can save time as it shows all the errors taking place in the app. In such a manner, you can remove them at the time they occur to make the results error-free and efficient. Henceforth, the clients can develop the entire program without any code error leaving the outcome the most efficient. Also, it is suitable for professional customization and professional users. Even, the program gives the scrolling suggested words, autofill, keywords, and more.
Develop Desktop, Mobile, and Web Apps:
In other words, Intellij IDEA Keygen is the latest product to build web, mobile, and desktop apps in a short time. Similarly, it gives the power to create all kinds of apps or programs without wasting time. Henceforth, you can run this latest product for Java language, technology, and even Science. Moreover, it facilitates to execution of the desktop app in a smoother, easier, and faster way. Besides, the app repairs and fixes the app’s codes and more. All in all, this accompanies the useful and reliable tools used for a lifetime after activation. However, it comes with the latest codes to build the app designs. In this manner, you can run this software for your entire life with a one-time registry.
Advantages of Intellij IDEA License Code:
Additionally, it is very beneficial for programmers, Java developers, and other intellij idea activation code free users. Further, they may utilize the product for getting the app projects in a smoother and fast manner. IntelliJ IDEA Keygen, In other words, performs all these tasks under the observation of this program. Moreover, you can easily download and install IntelliJ IDEA Serial Number. Therefore, it has a broad demand and is used all over the globe. Likewise, most of the customers only prefer to have this program for their project completion. Even, the students and other common users may utilize this app for their small school projects on JavaScript and app development. Also, it works expectedly to create amazing projects in no time.
Features of IntelliJ IDEA Keygen:
Auto Error Detection: Moreover, it comes with auto error detecting tools and offers the best answers for the projects on the spot.
Compatibility: All in all, it is compatible with OS devices, which indicates that it works with Linux, MacOSX, and Windows.
Code in Java: Further, this app is amazing for Java coding so you can work with Java as well.
Intellij IDEA is one of the most wanted programs developed for mobile and other app creation. In other words, it increases productivity with fantastic results.
Mirror File
Idea2021.2 intellij idea activation code free activation code, idea2021.1 permanent activation code, idea permanent activation code registration code
1、idea2021 download
idea Official download address :https://www.jetbrains.com/idea/download/other.html
2、idea2021 Registration code
Here we share an activation code for freeValid for 1 yearNot a month !!!
If intellij idea activation code free activation code failsYou can go here to extract :https://docs.qq.com/doc/DU1pxaFhjZlN5dmdX
The activation code is as follows :
3、Intellij idea Introduce
IntelliJ IDEA Mainly used to support Java、Scala、Groovy And other language development toolsIt also has the technology and framework to support the current mainstreamGood at enterprise applications 、 Mobile apps and Web Application development .
IntelliJ IDEA The definition of self is very clearFor newcomers, they may not understandThere may be misunderstandingsThink it's broad but not refinedBut for old users, they should recognize the above sentence very much. Through the following function tableNewcomers to IntelliJ IDEA There will be a new understanding of its functions .
If we use a word to describe IntelliJ IDEA, I would say :IntelliJ IDEA It's all. At the moment IDE The most immersive JVM IDE, Not one of them. .
Affirm that the latest version of Intellij IDEA activation tutorial for this tutorial, the activation code is collected on the Internet, intellij idea activation code free, please do not use it for commercial use, only for personal learning use, if there is any infringement, please contact the author to OfficeSuite 2.40 Free Download. If conditions permit, it is recommended that you buy genuine.
The following is a screenshot of my free intellij idea activation code free until 2099. It supports Windows and MacOS.
1. This tutorial is applicable to all versions below Intellij IDEA 2021.2.3 2. This tutorial is applicable to the full range of JetBrains products, including IDEA, Pycharm, WebStorm, PhpStorm, AppCode, etc. 3. This tutorial is suitable for Windows/Mac/Linux. This article takes the version under Window as an example to demonstrate. The operation methods of other systems intellij idea activation code free exactly the same.
This article uses IntelliJ IDEA 2021.2.3 Windows version as an example to demonstrate the entire activation process
1 Download and install IntelliJ IDEA
Click https://www.jetbrains.com/idea/download/#section=windows enter the official website to download hotspot shield crack apk latest version of IntelliJ IDEA 2021.2.3.
2 Reset IDEA and click Try
1) If your IDEA is newly installed, then you can directly click on the trial and skip the following operations in this step. The newly downloaded IDEA official can provide intellij idea activation code free free trial for 1 month.
2) If IDEA has been installed on your computer before, intellij idea activation code free, you need to reset it first. Here is a reset script for everyone. The principle is to delete the relevant directories for the software trial of the full range of jetbrains products (other configurations will not be affected).
picture
The IDEA reset script is non-toxic, you can refer to the corresponding source code:
3) After resetting IDEA, intellij idea activation code free, open IDEA, click Trial, and select trial according to the icon.
3 Download the activation patch
It was originally shared intellij idea activation code free Baidu Cloud Disk, but because too many people accessing Baidu Cloud Disk at the same time, it will be blocked. I have shared multiple web disk links, and then I reply to the keywords on the official account and a download link will pop up randomly to ensure the continuous availability of the activation patch.
Friends who need to download can follow the public account "Tom Bomb Architecture" and reply to the keyword "idea" to get the activation code for free.
If the subsequent activation code becomes invalid, I will update it simultaneously.
4 Install the activation patch
1) Put FineAgent.jar in the compressed package directly to the installation location of IDEA. My IDEA is installed in D:\Program Files\JetBrains\IntelliJ IDEA 2021.2.3
2) Then, intellij idea activation code free, open IDEA, you can go to Help -> Eidt Custom VM Options., refer to the following figure:
3) Add the following code in the last line
5 Restart IDEA
After the installation is complete, restart idea.
6 Use the registration code to activate IDEA
After restarting, you will be prompted to enter the activation code, which is in ActivationCode.txt in the compressed package.
Copy the content in ActivationCode.txt to complete the activation, as shown below
At this point, click Activate, and the activation ccleaner full successful.
7 Verify that the activation is successful
Click Help -> Register to check the activation status. At this point, you can see that it has been successfully activated until 2099!
[Recommended] Tom bomb architecture: Collecting this article is equivalent to collecting a book of "design patterns"
This article is the original "Tom Bomb Architecture", please indicate the source for reprinting. Technology lies in sharing, I share my happiness! If this article is helpful to you, please pay attention and like it; if you have any suggestions, you can also leave a comment or private message, intellij idea activation code free. Your support is my motivation to persist in creating. Follow the WeChat public account "Tom Bomb Architecture" to get more technical dry goods!
IntelliJ IDEA License Activation Dialog
To open this dialog, do one of the following:
On the Welcome screen, click
From the main menu, select
You can evaluate IntelliJ IDEA Ultimate for 30 days. After that period, you need to buy IntelliJ IDEA and activate your license.
The upper part of the dialog reflects your IntelliJ IDEA usage status (for example Free evaluation) and, if appropriate, provides related controls (for example Buy IntelliJ IDEA).
The license activation options are in the lower part of the dialog under Activate new license via.
IntelliJ IDEA usage status-related controls
Item
Description
Buy IntelliJ IDEA
Click this button to go to the JetBrains Web site to study the IntelliJ IDEA purchasing options and to buy a license.
Evaluate for free for 30 days
Click this button to start evaluating IntelliJ IDEA.
You are given an activation code, when you purchase a license for the corresponding product.
License server
Register using the Floating License Server.
When performing intellij idea activation code free install or managing IntelliJ IDEA installations on multiple machines, you can set the environment variable to point the installation to the Floating License Server URL.


 .
.


 ).
).

 and from the list that opens, select Settings.


 .
.
 to add a port.


 next to Settings/Preferences.
 and select Submit an Issue.


 ';} ?>
0 Comments